
I have planning and testing for a long time, for the best solution for the wireless sensor. And im almost ready for the final.
The sensor will have both wireless and cable mode, so it’s possible to use both ways. The wireless sensors will run on 9v battery.
I also made a huge modification on the main system. Upgraded from Arduino UNO to an Arduino Mega. There is now an bigger LCD (20×4) and added an SD card module so i can store best time and other stuff like that.
And also i have added an RTC module so i can store the time and date. Beside that i have added an terminal printer so i can print out the result on paper and also the highscore.
In the software its now possible to setup up to four (4) players. More on the main game changes will come soon, but remember that you need to do a huge change on the main system to use the wireless mode.
The wireless system
To built the wireless system you need the following things:
- Arduino Nano x4 (I use Chinese nanos)
- Piezo Element X4
- Green, Red & Blue Led X4 of each color
- 220 ohm resistors x12 (3 on each sensor)
- nRF24L01+ Wireless transmitter X4
- 100 uF 10V Capacitors X4 (Used to get a good voltage for the NRF24)
- Schottky Diods 1N5817 X8
- Zener Diods TZX5V1B-TAP X4
- 1M Ohm Resistors X4
- Ceramic Capacitors 0.01 uF x4
- 9v Battery x4
Beside that, you can have an power switch, and also a good case that you place your sensors in. This is how my targets look like:

I made it possible to use cable version also, i have an ON-ON switch with two different inputs so when the wireless targets is off, the cable version can be used (this is not in the electric sheet) The case is hard aluminum case.
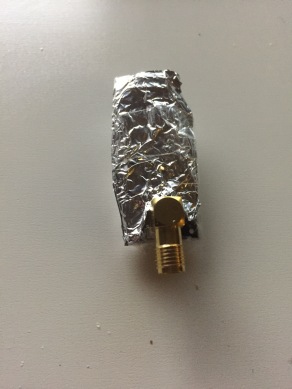
There is two types of transmitters. The first is the one with an built in antenna. They work good but the range is not the same. But you can solder on an extension on the built in antenna if you will place the antenna hidden inside the target.
On my construction i have chosen to use the external antenna model, to get longer range. They are bigger but you get a longer range. To isolate the transmitter so you get even better range is to first add plastic foil around the transmitter, and on top aluminum foil. This will block electronic signals from cables and arduino that can interrupt the signal on the transmitter. (See picture)
The targets identify them self thru different numbers that the main system sends out when it’s time for activate, if the system sends out for example 17, then the first target will activate the light. After sending out, the main system will go in to listening mode and wait for an answer. The answer is sent out from the target when an hit is made. This is also an number, in this target it will be 18. Now the hit is stored and the system will switch targets.
To make it easy there is just one Arduino code for all 4 targets, all you need to change is in the #define SENSOR1 to the right sensor. If you don’t change this on each sensor, all sensors will have the same numbers and same pipe addresses. Please note that the code is still under progress and can be updated. But right now is the most stable version.
To download the code for the sensors, please visit the following address: https://github.com/shootinggame82/Shooting-Sensor

16 May, 2017 at 21:40
I’m making something very similar for my local gun range. I see the code for the wireless sensor on github. Has this been integrated with the code for the control board?
LikeLike
21 May, 2017 at 19:59
Hi Erik, i have today uploaded a new version on the code, also the code to the main system. I got it working nice now so i call it an official release 🙂 But it can hold some bugs, and maby there is other ways to write the code, but I’m just an amateur 🙂
LikeLike
22 October, 2017 at 00:00
Man, i was trying to figure out how i would do this game for a long time.. i even start to draw schematics and write the code, but i was so far from finishing.. and then i found you! didn’t read the code yet, but the video says for itself, your system is amazing! I’ll try to adapt the code for me, and if i have any doubts would you help me out? this project will be very fun.. and i’m very thankful to you for sharing this!
LikeLike
22 October, 2017 at 08:08
Hi Fernando.
Im happy you find my project 🙂 It’s working very good, both wireless and wired version. I have use it many times now. And of course I help you with your questions.
Best regards /Andreas
LikeLike